Are you also exhausted the permissible WordPress limit and looking for how to increase WordPress memory limit? Then don’t stress; I will elucidate the best methods to increase WordPress memory so that you get rid of the frustrating error messages of memory exhausted.
Every WordPress site comes with a dedicated memory limit where PHP codes are inherited to run the website. If you use rich images, large un-updated plugins, and hefty PHP codes, then it is possible to run out from the WordPress memory limit soon. However, escalating the memory limit is not a hard nut to crack if you follow the right guide I am providing here.
Don’t confuse WordPress memory with PHP memory. PHP is a programming language in which WordPress site is written in form of codes. Increasing PHP memory limit ultimately means increasing WordPress memory limit.
Why WordPress memory limit exhausted?
WordPress is one of the best web development platforms, which allows a wide range of themes, plugins, and other software. This is also necessary to use different software and plugins to grow the site, and WordPress does it well as compared to the WordPress competitors.
On the other hand, using rich features to grow the site briskly also leads to memory exhaustion. In general, WordPress’s default memory limit is 32MB, but this can be raised to 40MB and 64MB for single-site and multi-site installations, respectively.

If a site exhausted the above-stated WordPress limit too, then it got a memory limit error: Allowed Memory Size Exhausted. At this point, you need to increase the WordPress memory limit by increasing PHP memory to run the WordPress functions efficiently. So, without wasting much time, Let’s learn how to increase WordPress memory limit quickly.
Free Tip: Try to upload compressed images to your site and regularly update the installed plugins to avoid memory drain issues. You can use TinyPNG and SmallSeotools to compress images.
How to Check WordPress memory limit?
You can quickly check what is your default WordPress memory provided by your hosting service. It is good to know the memory limit for easy optimization of your pages and posts.
- Go to your WordPress dashboard.
- Scroll down and look for the tools tab among various options on the sidebar.
- Inside the tools tab, click on Site health by hovering the mouse.
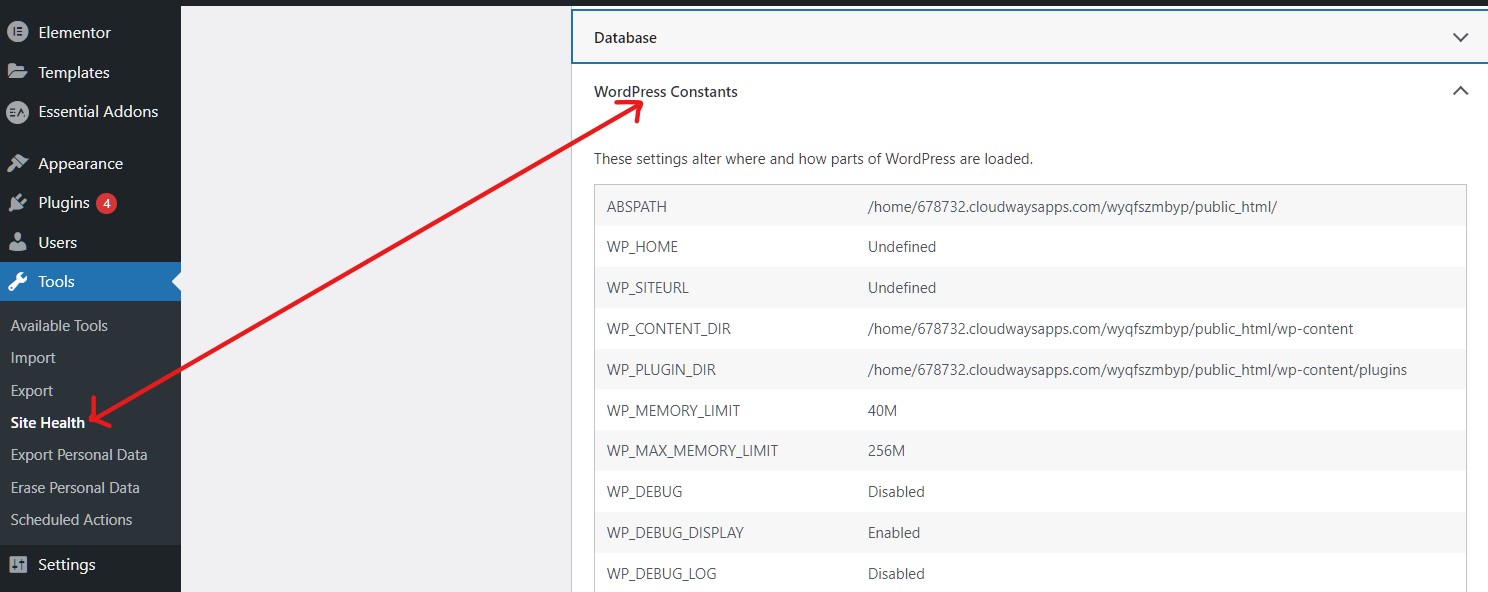
- Scroll down the Site health page and look for WordPress constants.
- Here, you can check your WordPress memory limit and maximum memory limit.
How to increase WordPress memory limit?
I would recommend taking a backup of your site before increasing the WordPress memory limit, as increasing memory limits some code changes. You can use the most trusted backup plugin UpdraftPlus to make a backup; otherwise, you can also make a clone of the WordPress site.
I will discuss here the 4 best ways to increase WordPress memory limit; you can implement any of them, or whichever is suitable as per your WordPress hosting.
- Edit wp-config.php file.
- Edit PHP.ini file.
- Edit .htaccess file.
- Upgrade Hosting plan.
1. Increase WordPress memory limit via editing wp-config.php file.
You can easily find and alter the WordPress memory by accessing your wp-config.php file, which is located in the file system’s root directory. However, you only can increase the memory limit with this method if memory is lower than the permissible level of your hosting plan.
- To edit the config.php file, you first need to connect your server with FTP (File Transfer Protocol) using the FTP client.
- You can use any FTP client at your convenience like Filezilla, CuteFTP, etc. I would recommend Filezilla if you are doing this first time.
- Now, inside Filezilla, navigate file then Site manager; File>>Site manager.
- Select the site in which you will edit PHP files and click on this.
- If you haven’t added your site, then put basic information regarding your site and connect.
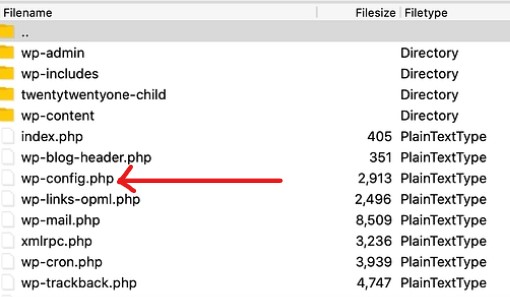
- Inside the root directory folder, look for the wp-config.php folder.
- Hover the mouse over wp-config.php, right-click, and select the view/edit button.
- The PHP file will open on your default WordPress editor.
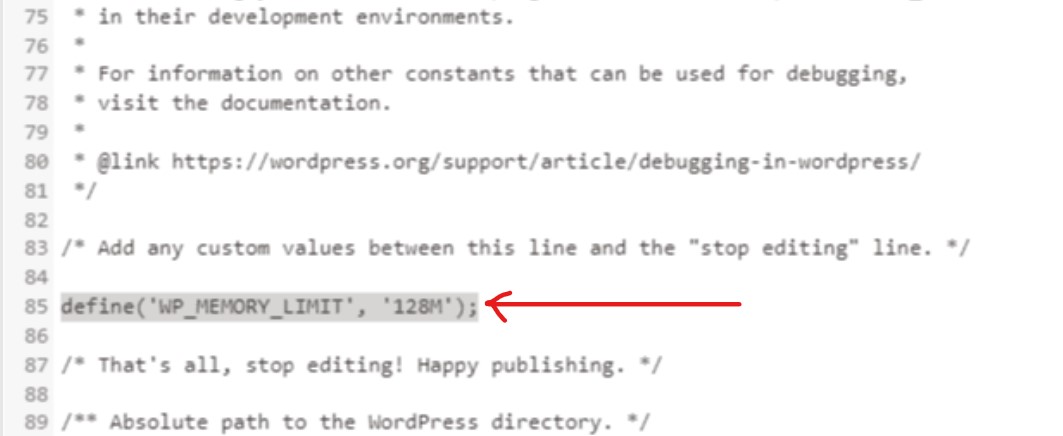
- Perform CTRL+F command and search for WP_MEMORY_LIMIT.
- In the above case, the WordPress memory limit is already 128M which is sufficient.
- In place of 128M, there could be 32M OR 64M, which you can replace easily by 128M Or 256M. That’s it. Save the current settings and enjoy extended memory!
2. Increase WordPress memory using the PHP.ini file.
There is a possibility that you aren’t able to boost WordPress memory from other methods, so you need to do this with your server settings. This method also includes the restriction that you must have only personal hosting, not shared hosting.
- Navigate to your cPanel.
- Look for the Software section where you either find MultiPHP Manager, MultiPHP INI Editor, or PHP Config.

- Open this application which gives you access to various PHP directives.
- Scroll down and look for the memory_limit tab.
- Look at the front; you can see a numbered rectangular box.
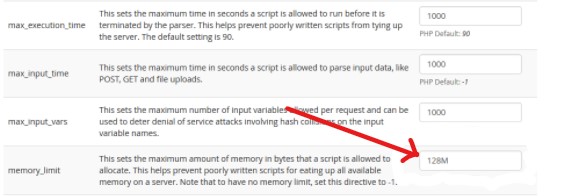
- Click on the box, enter the required memory amount, and save the page.
- Restart your server and enjoy memory extension.
3. Increase WordPress memory via editing the .htaccess file.
Editing .htaccess file to increase WordPress memory limit is a relatively easier method as we already discussed how to access the read directory in 1st method.
- Follow method 1st to open FileZilla FTP client.
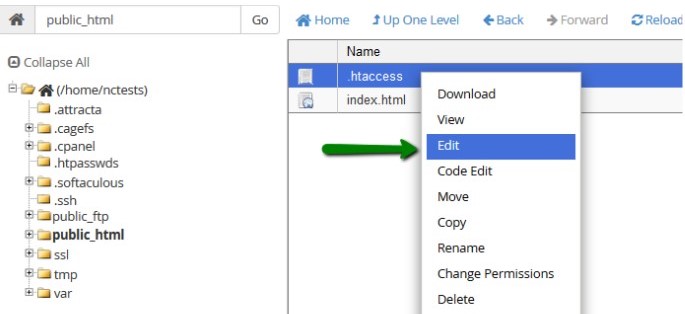
- The inside root directory, look for public folder and then .htaccess file inside this.
- Open .htaccess file to edit. It looks like as below screenshot.
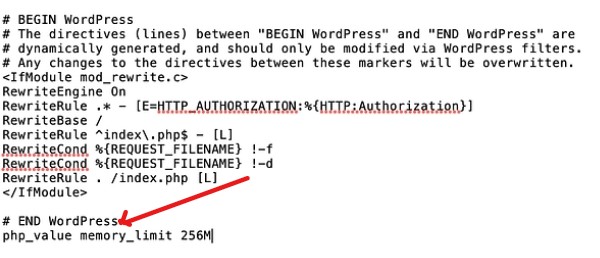
- Look at the bottom; you find the # END WordPress sentence. Just below this, add the below code.
php_value memory_limit 256M
- You can change the number if you want to increase 128M instead of 256M and save the changes.
4. Final Solution: Upgrade Website Hosting Plan
If you tried all the above methods of increasing WordPress memory limit, then upgrading your website’s hosting plan is the last resort. However, the methods mentioned above are the best working methods, but in the end, you can only increase the memory limit up to permitted by your hosting plan.
When you build your website, you have to select a hosting plan accordingly, including a memory limit. Memory is restricted from 32M to 256 or higher depending on the plans. Usually, low-cost plans have lower memory, and as the prices hikes, you get better memory allocation; 256M or more.
So, if you cannot increase the WordPress memory limit, you might be required to purchase higher memory plans. For this, you need to contact your hosting company and discuss the issues. I hope you like this article on how to increase WordPress memory limit; if you find any problems with implementing these methods, then feel free to comment.