Are you thinking of running Facebook ads on your website? Then you must learn how to add a Facebook pixel to WordPress websites.
In this article, I will discuss two simple methods to add a Facebook pixel to WordPress. Having a Facebook pixel to run Facebook ad campaigns and optimize them easily is essential. So, let’s discuss how to add a Facebook pixel to WordPress.
What Is Facebook Pixel?
Facebook pixel is a piece of code that you need to place on your WordPress website to track, manage, and optimize Facebook ads. In other words, a Facebook pixel is Google Analytics for Facebook as GA is for websites.
Additionally, you can develop Custom Audiences, plan events, and overall manage your Facebook advertising campaigns more effectively.
How To Add A Facebook Pixel To WordPress Manually?
You have two ways to add a Facebook pixel to WordPress; the Manual method and the Plugin method. To integrate a Facebook pixel to WordPress, you must have a Facebook pixel account.
Then you have to add provided pixel code to the <head> section of your website. It might seem like a lot of work, but it would be easy if you followed the below steps correctly.
- Also read: How To Embed Tweets In WordPress?
Step 1. Create a new Facebook Pixel account
The first step is to open the Events Manager area in Facebook Business Suite or click here. This link leads to the new page, as shown below.
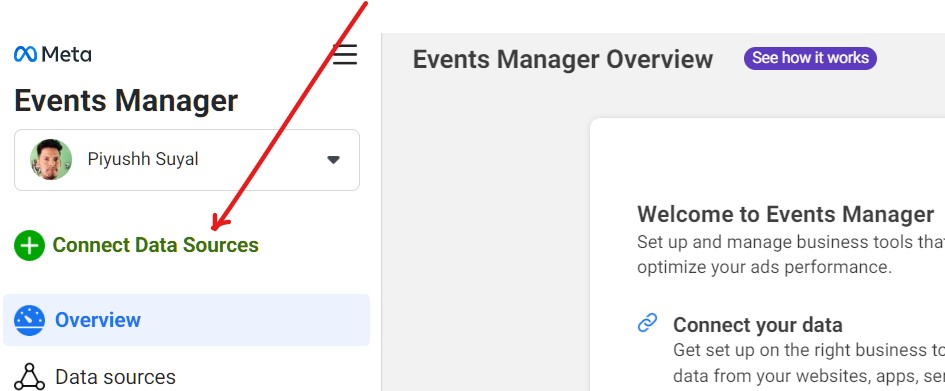
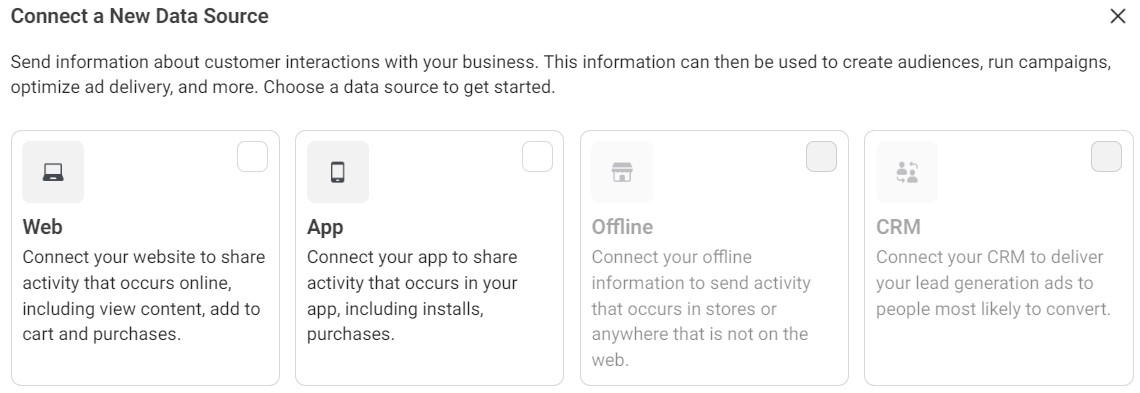
Click on the connect data sources, which display a prompt notification. You need to select a new data source. Select the web option to connect and share your web activity.
Now, click on the connect button to proceed. As soon as you click on the connect, you will get another prompt, give a name to the pixel, and click on create pixel button.
Enter your website URL address which you want to add with Facebook pixel. Press the Check button.
![]()
Next, select the conversions API and meta pixel option and click on the next button at the bottom.
Step 2. Connect website activity using Pixel
Once the above steps of how to add a Facebook pixel to WordPress are completed, you are asked how do you want to install pixel code.
![]()
Select manually add pixel code to the website. You will be displayed a Facebook pixel tracking code that you need to enter into your website.
![]()
You have given a base Facebook code; copy the code by clicking over it. This code needs to be added to the header section of the website. Also, turn on the automatic advanced matching toggle.
Step 3. Installing the pixel in the <head> section
This is the important step where you need to add copy pixel code to the <head> section of the website. There are numerous ways to add code to the header of a website, though I recommended the simplest plugin, WordPress header, and footer.
Install the plugin from the WordPress dashboard and hit the activate button. The installed plugin will be added to the settings.
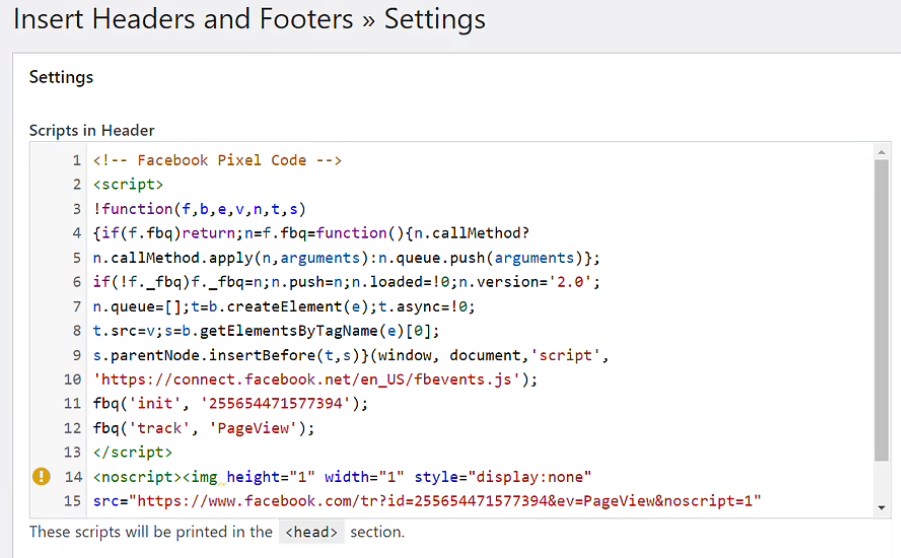
Head to the plugin from your WordPress settings. Then, paste the above code under script in the header and click on the save changes button.
Now, go back to the page where you got the Facebook tracking code. Click on the continue button and finish the setup.
How To Add A Facebook Pixel To WordPress Using Plugin?
Though, the above method of how to add a Facebook pixel to WordPress is sufficient enough. Yet if you want more functionality and features like Google ads tag, google analytics, and Pinterest tag, I recommend using a plugin.
Step 1. Install and activate the PixelYourSite plugin
The easiest plugin to do so is PixelYourSite which can be easily downloaded from the WordPress dashboard.
![]()
Go to your plugin directory, search the plugin, click on the install button, and finally hit the activate button. Once activated, it will be added to your WordPress account.
Step 2. Create and get Pixel code
You don’t have to do anything in this step. This step is exactly the same as what you have done previously in the manual method; Step 1 and step 2.
Step 3. Paste pixel code into PixelYourSite settings
From the dashboard, go to the PixelYourSite plugin. By default, you are on the general tab.
![]()
Paste the pixel code in the blank space that you got in the above step. That’s it, save the setting and enjoy seamless Facebook ad tracking. You can add multiple tracking ids, including Google Analytics and Pinterest; however, you need the Pro version for this.
How To Test Facebook Pixel Integration?
Once you have completed all the steps of how to add a Facebook pixel to WordPress websites, you must check whether your integration working properly or not.
For this, you have to install and add Facebook pixel helper chrome extension to your browser. After installation, you can check individual pages if there is a pixel installed on a particular webpage.
![]()
You have to open the webpage of a website on which you integrated Facebook pixel and click on the extension button adjacent to the address bar. If there is a pixel working, you will see the pixel id along with green checkboxes, as shown in the above screenshot.
Final Thoughts
Today, in this article, we have learned how to add a Facebook pixel to WordPress accounts or websites. As we know, Facebook pixel integration with the website is crucial to accurately tracking ad campaigns.
We have discussed two very easy methods to connect WordPress to Facebook Pixel; the Manual method and the PixelYourSite plugin method. Please follow every step very carefully for easy and hassle-free integration. If there is any issue, let us know through the comments.